→
Documentation for installing
the Divi Landscaping child theme.

Requirements
Before you begin, ensure you have the latest version of Divi installed on WordPress before you begin to install this child theme. We recommend using a fresh WordPress installation.
The Divi theme is not included in this package. The Divi theme is included with a subscription to Elegant Themes.
Things to note
If you use the images included within this child theme, you must credit the author. Details of this are found in the footer. If you do not credit the author, this is at your own risk.
Some images are subject to copyright license and have been replaced a placeholder image.
Please click here if you are installing the Divi Landscaping Layout.
If you have purchased the Divi Landscaping Child Theme please read the documentation below.
1. Download and activate the Divi Landscaping child theme.
If you haven’t already download the child theme during purchase, please visit your account to download it.
The filename is divi-landscaping.zip
In your WordPress dashboard navigate to Appearance > Themes and click on Add New.
Remember you must have the Divi Theme installed and activated already before uploading this child theme.

On your computer locate the divi-landscaping.zip and then click Install Now.
When the install is complete click on Activate, you will then see the Divi Landscaping child theme as the active theme in your theme panel.
2. Importing the child theme demo content
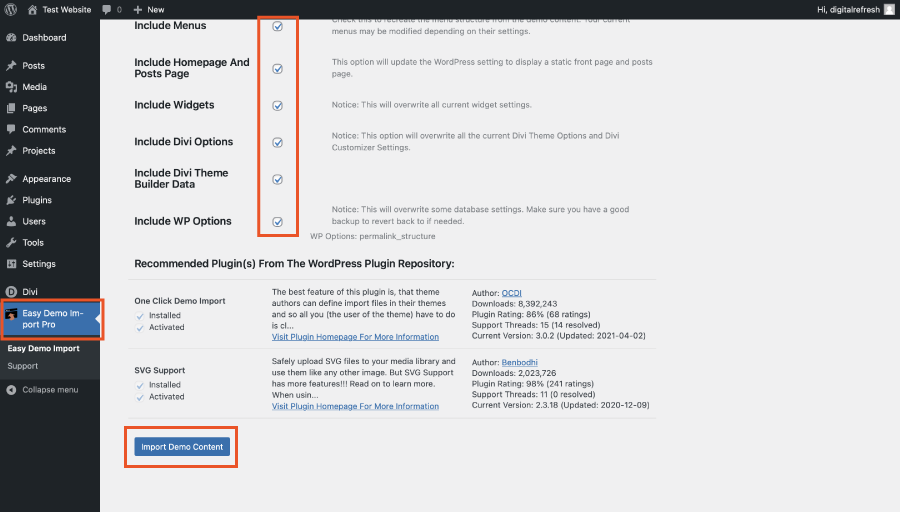
Down the left hand side of the WordPress dashboard you will find a new item has appeared, Easy Demo Import Pro. Click on this and you will be taken to the import screen.
On this screen all the options should automatically be checked including installing and activating the recommended plugins for this child theme. If they are not, check them all.
Click on Import Demo Data.
After the demo content has finished being installed you will see a screen confirming the items which have been imported with a yellow tick next to them followed by Import Process Completed.
Voila, your new child theme is set up and ready to customise.
Click on check our your new homepage or click on your website title at the top left of the page to view your new website.
3. Updating all the service and button links to your URL.
Be sure to change ALL button links and service image links within the website to your own.
ALL links within the website are linked to our demo child theme so if you miss one, your client will be re-directed back to our demo site.
You can quickly change all links using the Velvet Blues Update URLs plugin which has been automatically installed as part of the child theme.
Down the left hand side of the WordPress dashboard, navigate to Tools > Update URLS.
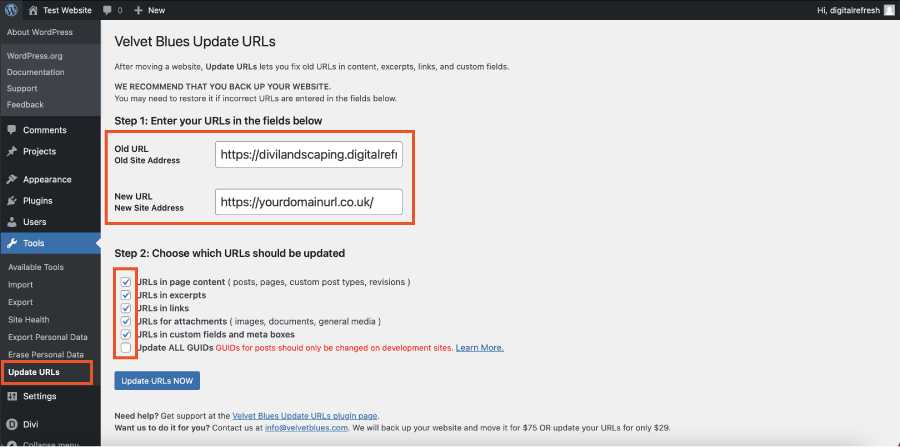
In the Old URL box enter https://divilandscaping.digitalrefresh.uk/ – be sure to include the forward slash / at the end of the URL.
In the New URL box enter the exact URL of your website. This is the URL of where you have installed this child theme – be sure to include the forward slash / at the end of the URL.
Check all boxes except:
Update ALL GUIDs GUIDs for posts should only be changed on development sites. Learn More.
Click the blue Update URLS NOW button.
You’ll see a confirmation of how many URLs have been changed.
4. Changing the URLs for the services sidebar buttons.
If you have changed the page names of the services within the demo content, remember to change the name of the button and link URLs to the relevant service and page.
These buttons have been set up as global items meaning you can change them on one page and it will automatically update throughout the rest of the website including post pages.

The sidebar CTA block works the same way, change the contact details on one service page and it will automatically update throughout the rest of the website including posts and project pages.
5. Changing colours that don’t appear in design options.
Most of the colours within the website can be changed to your own by using the design options tab when editing modules, and via Appearance > Customise, which can be accessed down the left hand side of the WordPress dashboard.
For some of the customisations, including menu hover options, back to top button, contact form success message, FAQ accordion and the service page gallery arrows, the CSS for these can be found in the child themes style sheet.
The style.css file can be accessed and edited via FTP.
Alternatively you can edit this directly within the WordPress dashboard by going to Appearance > Theme Editor.
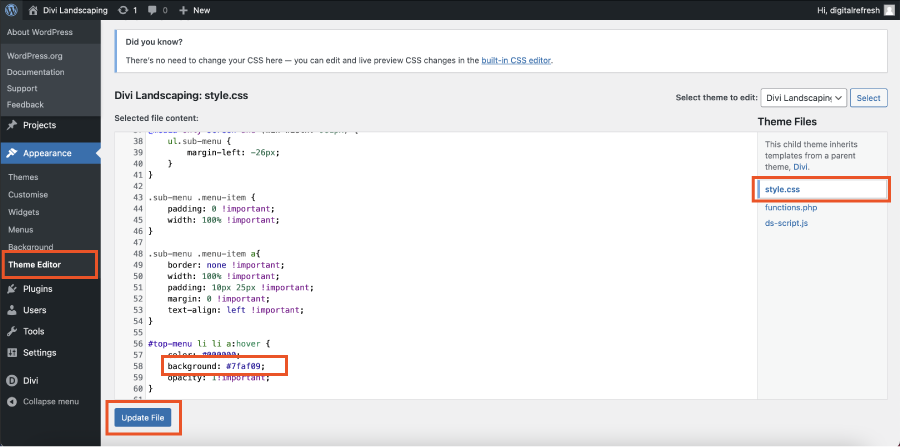
You will receive a warning to ensure you understand “Editing your theme directly could break your site and your changes may be lost in future updates.” but if you just edit the colour hex codes, #7faf09, which is the green colour, and then hit Update File, you should have no problems.
Note – You will be warned when you Update File if there are any errors but if you are worried about breaking your website, copy and paste the whole stylesheet, style.css file, into a notepad or text document on your computer so you can replace it and start again if needed.